Thursday, May 31, 2012

Audio Upgrades

     My boat was not equipped with the upgraded, optional sound system from the factory. The standard sound system consisted of 4 cabin speakers, and 4 cockpit speakers, all of mediocre quality.

     So, my first step was to remove the Clarion head unit and 6 disc changer, and sell them on Ebay. Located behind these components, the factory mounted two small 2 channel amplifiers. The four cabin speakers were paralleled on one amp, with the four cockpit speakers on the other. So, I rewired both amps to turn on via the cabin switch, and used each one to power a pair of the cabin speakers. This doubled the available power in the cabin, reduced the loads on these amps, and cleaned up the sound inside the boat. It also left me with no amplifier for the cockpit.

     After considerable research and amplifier evaluation, I chose to power the cockpit sound system with an amplifier from MB Quart.


This amp is quite robust, has 4 channels for the cockpit speakers, and a fifth channel for a subwoofer. The 4 channel amps run in class AB (analog), which I prefer over class D (digital switching), for a smooth, musical sound. The fifth channel runs in class D, which is quite appropriate for a high powered, low frequency sub amp. Best use of power and efficiency, in my view. This amp was powered with a dedicated, fuse protected circuit, and is now located in the hanging locker, adjacent to the mid stateroom.

     My next post will detail the new head unit, remote control, Ipod docking station, and new speakers and enclosures.

Tuesday, May 22, 2012

Hatch Bedding & Deck Hardware

     This post is a bit out of order, but I am trying to catch up on the backlog I created over the winter. During the cold season, I did complete quite a few maintenance tasks, and I'll try to get some of them up here for viewing.

     If you own a boat, you should know that all the hardware mounted on deck needs to be re-bedded periodically. How you decide to schedule the work is up to you, but, since the recommended interval is about 5 years, I recommend that you re-bed 1/5 of your deck hardware each year. That way, it never gets away from you, and it's not such an overwhelming job when the time comes.

     This year, I decided to re-bed all three deck hatches, both deck rails (the stainless rails on deck, between the hatches), and the windlass foot switches. The first step is the easiest - just pull all the screws, and remove the pieces....


The pictures above show the deck coring, after the hatches are removed. It is very important to carefully inspect and evaluate these areas, once they are exposed. Water intrusion will slowly soften and rot the balsa coring, resulting in delamination and subsequent weakening, or failure, of the deck structure. Once you have access, take a screwdriver or pick, and probe the balsa, and see if there are any soft spots. Also, look for any telltale signs of water staining, discoloration, etc. If the coring is clean and dry, you can move on. If it is wet, it must be dried before proceeding further. If it is softened, or rotted, then the damaged sections will have to be removed, and the deck re-cored.

     Fortunately, as you can see, the coring below these hatches is unstained and dry. The factory applies a coat of gray paint as a sealant, but as the years go by, continued deck flexing cracks the paint. To further protect the balsa, I mixed up some West System #105 Epoxy, and applied 2 coats to all the exposed coring, then let it cure for a couple days. However, I did not apply the epoxy until a couple weeks had gone by, after I removed the hatches. That way, any residual moisture in the coring has time to dry out.

     After the epoxy has cured, the next step in preparation is to chamfer all the screw holes in the fiberglass. This is done for two reasons - first, a small chamfer holds a bit of sealant around the fasteners, and allows for a bit of flexure without compromising the seal. Second, the chamfer prevents gel coat cracking when the screws are tightened, and that also improves the seal and deck integrity.

     Now, once the deck and hatches have been cleaned and prepared for installation, I place the hatch in position, ,and start a couple screws to hold it in place. Then, apply tape to the deck, all around the hatch, as shown below:


     Around the corners, I use striping tape, because it can be contoured so easily. Once taped, pull the hatch, apply a large bead of sealant to the deck, and place the hatch back in position. Make sure there is sealant around and in every screw hole. Tighten the screws evenly, then remove any excess sealant, and finally, pull the tape. You should be left with a perfectly sealed component...

Saturday, May 19, 2012

Decking

As I mentioned in a previous post, the templates for the decking were sent to TTcustommarine for manufacturing. They came back last month, and looked great:


There are very detailed instructions on their website, so I am not going to print it all again here. I will say that my wife and I were able to do the entire installation in less than one day, so it's not so bad. Here is the finished install:


Saturday, May 12, 2012

TV Upgrade

This was a tough one. My boat, as a 2002, was never designed with flat screen TVs in mind. The original TV was a Cathode Ray Tube design - you know, the old tube style TVs that are as deep as they are wide. It was mounted in a large opening on the port side, adjacent to the galley. The TV sat atop a fairly rugged slide and pivot assembly, so the TV could be pulled out, then rotated for viewing.

I have seen many upgrades where the owners remove the original TV, and mount a modern flat screen on this same bracket. The new TV covers the opening, but the space behind the TV is wasted, and I feel the installation does not have an "original" look. So, of course, I decided on a much more difficult installation (seems to be a habit).

There is a rather large bulkhead in the 1999 - 2002 340s, opposite the helm station, that would be ideal for mounting a large flat screen TV. In fact, on the later model 340s (2003 - 2008), this is precisely what the factory does. The problem is, the later 340s have a vertical bulkhead here, while mine is sloped considerably. If I mount a TV here, the viewing angle would be horrible.

I had thought to place an actuator behind the TV, such that when the TV was turned on, it would drop to a vertical viewing angle. Then, when turned off, it would retract. And, I may still do that. But I was running out of time this year, and my wife and I want to enjoy the boat, so I built the first part of the system - a pivot mechanism - and I will operate it manually for the time being.

The bracket is a piece of 1/4" x 5" aluminum, milled and bent to fit the bulkhead shape. The first couple pics show it being machined in the mill:


The bend allows the bracket to fit tightly up against the bulkhead, while the hinge allows for the TV to swing down into viewing position. The TV mounting pattern is a standard 100mm x 100mm, so the bracket will work with a variety of TVs on the market. The cutout you see in the bracket allows for a swinging arm to pivot down, and hold the TV in the viewing position. It pivots back into the bracket, when the TV is "up". The finished machined parts can be seen below, before and after painting, and after assembly:


I mounted the bracket to the bulkhead with button head fasteners and nuts, then mounted the TV with the factory supplied machine screws. In the "up" position, it looks like this:


Here is a close up of the latch, which holds the TV to the bulkhead, when the TV is not in use:


Finally, for viewing, the arm swings down, and holds the TV precisely vertical, like this:


When the TV is up, full access to the hanging locked is retained. Electrically, everything had to be re-routed. The coaxial cables from the antenna ans shore connections were both rerouted to the starboard side, along with a new power wires and video/sound cables. This TV is a 12 volt, 26 inch model from Jensen, with LED backlighting and HD resolution. It also has audio out capability, so all sound is routed through the boats sound system - I turned the TV speakers off. The original Clarion head unit and CD changer were removed, and I replaced them with an MB Quart WM1-DVD head unit and Ipod docking station. Now, I can play CDs and DVDs through the head unit, and also plug in an ipod, and use it as a music server. The head unit has an optional wired remote, and this was mounted at the helm station, so I have complete system control from there. I'll do another post soon, and detail more of the audio/visual system.

Sunday, April 22, 2012

Flooring - Part 2

The floors are complete, finally. I have about 3 weeks into this project, with a total time investment of about 60-80 hours. There are a total of 13 teak trim pieces, each custom fitted. Before they were installed, I leveled the floor with an epoxy compound. The cabin floors on boats are not usually very flat, since the factory installs a carpet when they are done, and that can hide a variety of ills. Fiberglass tabbing, variations in laminate thickness, and other factors all contribute to uneven flooring. Since grinding the high spots can potentially weaken the structure, I decided to fill the low spots instead. It's a painstaking process, but the results are worth it.

Once the deck is prepared for the new flooring, I used a low strength adhesive, and bonded down each piece. The flooring is custom fitted - one section at a time. There are no straight lines or 90 degree corners on a boat, so it makes for a slow fitment. The adhesive is flexible, and if I ever need to get the floor up, it will lift, with a bit of persuasion. Hopefully, that day will never come.


These pics were taken just after the flooring was complete, so the rest of the interior is a bit of a mess. I wish I had a better camera - the pictures don't do the floor justice at all.

Sunday, April 15, 2012

Flooring and Trim

My wife has wanted a new floor in the cabin since we bought the boat. The original carpet was getting old, and some stains just wouldn't come out of it. So, we decided to go with a modern wood floor inside the boat.

I started by removing all the old carpeting in the cabin - both in the mid stateroom, and the main cabin. It's glued and stapled down, so it takes some time to get it up, and it's a slow process. Much of the adhesive is left behind on the cabin sole, and it creates a rough, irregular surface, so it also has to be removed. I spent a few hours on my hands and knees with scrapers, razor blades, and a belt sander to get it all off, but it is done.

The flooring I am using is an engineered product, with a composite backing, and a hickory top (yes, hickory). The composite backing provides good resistance to dimensional changes from temperature and humidity fluctuations, while the Hickory is a beautiful contrast with the Cherry cabinetry.

I have a few pictures for today - but they are really just teaser shots. I had to make 2 new hatches for the cabin sole - the old ones were just not up to my standards. Also, I wanted some trim to go around each hatch, so I decided on some solid custom teak. I had a nice 5/4 teak plank left over from a previous project, so I milled that into the required trim items. There are 13 different pieces, each custom fitted. Four are below:


These were shot before finishing to match the flooring, but I am not posting those pics until the floor is done. The new hatches are seen below:


 They still need some finish work, but they are roughed out, as you can see. I'll post more of the flooring soon - it's actually already installed, but I need to do a little cleanup first....

Thursday, April 5, 2012

Teak Decking

I have had the pleasure of working with Travis Tea and his team at TT Custom Marine, http://www.ttcustommarine.com/ , out of North Carolina, for the new decking I will soon be installing in the 340's cockpit.

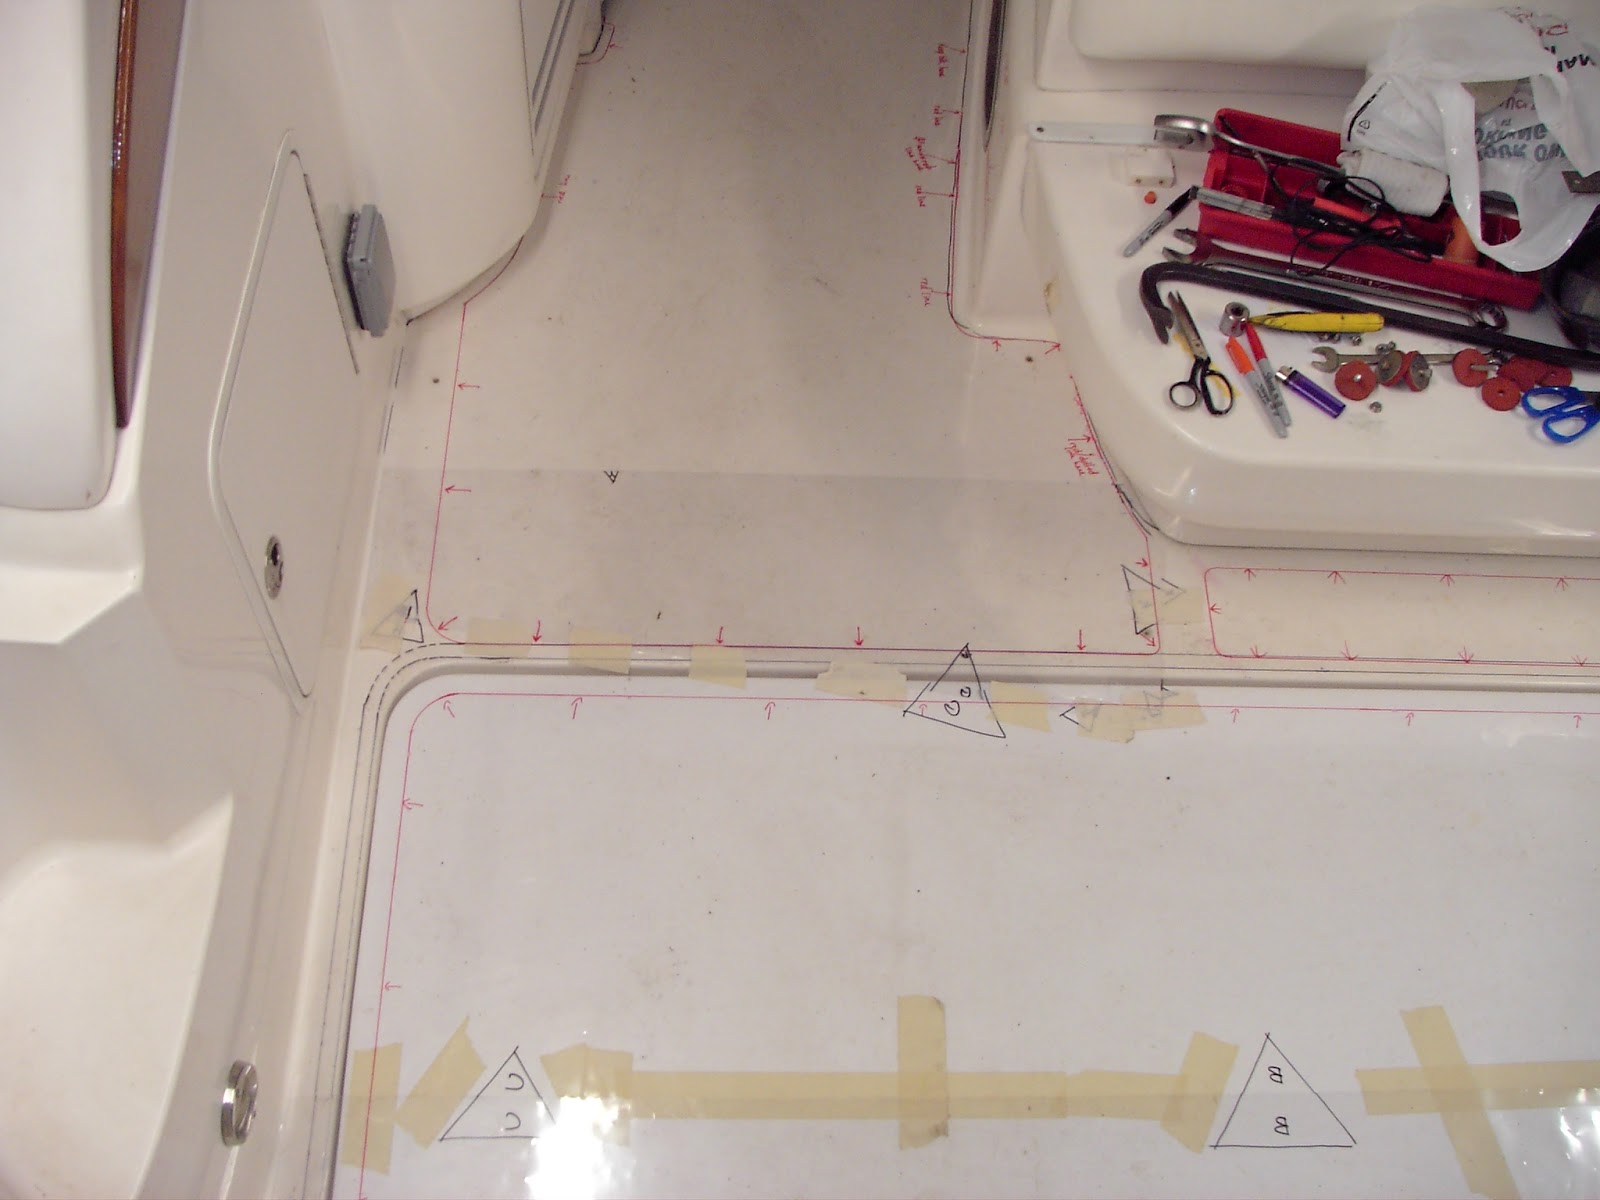
Travis sent me a series of pre-marked templates for my boat, which I then placed and aligned in the cockpit. I've made some changes to this boat (obviously), and wanted the decking to reflect the boat's custom boat builder theme. So, using a red marker, my wife and I meticulously adjusted the template to our liking. All the corners are precisely radiused, and we made sure that the spacing and alignment of each section was parallel and symmetrical.

If you look in the pics, you can see how we highlighted the proper cut lines, and left little notes for Travis and his team.


Once we were done, I decided against separating the templates from each other for shipping. Travis would have to re-assemble them, and no matter how precisely he did that, there would be increased chance for error. So, so he could see the whole picture at once, I rolled up the entire template as a unit (it was made of 3 larger panels, taped together), and shipped it in a long cardboard shipping tube. As part of the shipment, I included a CD with a dozen or so pictures of the template in the boat, after marking the corrections and changes, so Travis would have a means of seeing how the template related to the cockpit.

As the panels get installed, and as I get some pictures taken, I'll do a post or two on the installation. The interior is coming along too, so I'll get some pics up ASAP.